カレンダー読み上げのコード公開

カレンダー読み上げのコード公開

webcom_face_gcalendar
というリポジトリを作成する

Add a README file
にチェックを入れる

Description (optional)
はせっかくなので英語で解説を書いておく

OpenCVで顔の識別を行い
登録した人物の顔を認識したら
Google calendar API で今週の予定を取得し
Docker の voicevox で音声を生成し読み上げします

これを翻訳すると
Perform face identification with OpenCV
When the face of the registered person is recognized
Get this week’s schedule using Google calendar API
Generate and read audio with Docker’s voicevox

これをDescriptionに書いておく

Add .gitignore
はそのまま
.gitignore template: None
のままにしておく

ライセンスはMITにしておく

これでリポジトリを作成

次に

git clone git@github.com:Snowpooll/webcom_face_gcalendar.git

でリポジトリコピー

この時にSSHを使っているので
パスフレーズを入力する

cd webcom_face_gcalendar 

で移動し
ここへコードをコピーしていく

スマホからの写真を抽出できるようにするスクリプト

cp ../week_calendar_voice/resize_save.py .

ファイルサイズを調べるスクリプト

cp ../week_calendar_voice/file_info.py .

写真から顔のみ抽出するスクリプト

cp ../week_calendar_voice/generate_aligned_faces.py . 

切り出した顔のjpgファイルを読み顔の特徴量に変換するスクリプト

cp ../week_calendar_voice/generate_feature_dictionary.py . 

顔の得微量が近い人を検出するにはモデル

cp ../week_calendar_voice/face_recognizer_fast.onnx . 
cp ../week_calendar_voice/face_detection_yunet_2023mar.onnx . 

顔を期別した時にカレンダーを読み上げるメインスクリプト

cp ../week_calendar_voice/webcam_face_calendar.py . 

今週の残りの予定を取得し、音声ファイルを生成する

cp ../week_calendar_voice/calendar_audio_utils.py . 

Google Calendar API で予定を取得する

cp ../week_calendar_voice/calendar_utils.py . 

お知らせの音声

cp ../week_calendar_voice/notice.wav .

メンテの手間を省くため
Google calendar へ予定を追加するコードも別フォルダに入れておく

mkdir add_calendar
cd add_calendar 

こちらへGoogleカレンダー予定追加のためのスクリプトを保存する

未読GmailからGoogle calendar に追加するスクリプト

cp ../../week_calendar_voice/main6.py .
mv main6.py add_gmail_calendar.py 

GoogleDrive からGoogle calendar に追加するスクリプト

cp ../../week_calendar_voice/main4.py .
mv main4.py add_gdrive_calendar.py

和暦を西暦に変換するスクリプト

cp ../../week_calendar_voice/event_utils.py .

Google CalendarAPI で予定を追加するスクリプト

cp ../../week_calendar_voice/google_calendar_module.py .

Ollamaを使用してテキストから日時とイベントを抽出

cp ../../week_calendar_voice/ollama_module.py .

Gmailから本文を抽出する

cp ../../week_calendar_voice/gmail_utils.py .

Gmailのラベルを調べるスクリプト

cp ../../week_calendar_voice/label_gmail.py .

GoogleDrive の指定フォルダからPDFを取得し本文を抽出

cp ../../week_calendar_voice/drive_pdf_extractor.py .

GoogleDrive にフォルダを作成し、そこからPDFファイルを取得し内容を抽出

 cp ../../week_calendar_voice/g_drive/create_folder.py .

次に

touch requirements.txt

でインポートするライブラリ関連を書いておく

numpy
opencv-python
pytz
requests
google-auth
google-auth-oauthlib
google-auth-httplib2
google-api-python-client
playsound
pdfminer.six
python-dateutil
git add .
git commit -m "add code"

Gitignore を忘れていたので

vim .gitignore

内容を

token.json
credentials.json

を追加

再度 リポジトリ登録する

git add .
git commit -m "add gitignore”

あとは

git push -u origin main

で送信
チラシ解析のソースの公開

チラシ解析のソースの公開

store_adversting_lists
としてリポジトリを作成し公開する

リポジトリは
https://github.com/Snowpooll/store_adversting_lists

descriptionは

OCR the content of the flyer
If your purchase matches
Send product name and flyer image with line notify

チラシの内容をOCRし
購入すとにマッチした場合に
line notify で商品名とチラシ画像を送信する

Public にして
Add a README file
にチェック

License はMITにして
リポジトリを作成

git clone git@github.com:Snowpooll/store_adversting_lists.git

でリポジトリコピー

あとはファイルをコピーしていく

cp ../store_adversting_list/gmail_url_extractor.py .

gmailで件名を指定し未読の最新1件取得しURL抽出

cp ../store_adversting_list/image_downloader.py .

画像ファイルダウンロード

cp ../store_adversting_list/line_notify.py .

Line notify送信関連

cp ../store_adversting_list/settings.json . 

キーワードリスト

cp ../store_adversting_list/utils.py . 

あとでyolov8を使う時に使うモジュール

cp ../store_adversting_list/config.json . 

Line notify と xpathの設定ファイル

cp ../store_adversting_list/image_ocr_notifier.py . 

Cloud vision api のOCRと メイン処理

vim .gitignore

で除外するファイルを設定

token.json
config.json
credentials.json
/images/

もしコミットしているのなら

git rm -r --cached images

で追跡解除可能

次に
requirements.txt
の作成

google-auth
google-auth-oauthlib
google-auth-httplib2
google-api-python-client
pillow
selenium
google-cloud-vision
requests

として保存

あとは公開するので

git add .
git commit -m "add code"

git push -u origin main

で公開

とりあえずREADMEは後で書く

Markdownの記述メモとGithub へソースコード公開

Markdownの記述メモとGithub へソースコード公開

Markdownの書き方

を参考に

# 見出しレベル1
## 見出しレベル2
### 見出しレベル3
#### 見出しレベル4
##### 見出しレベル5

見出しレベル1
=========

見出しレベル2
---------

レベル1は
H1

と同じ

ソースコードは
バッククォートを使ってコードを囲む

改行は行末にスペースを2つ入れる

URLはそのままでOK

# mail_voice
Read unread Gmail text with URL removed. If there is a link in the text, open it with selenium and download the PDF.

特別支援学校のお知らせがCocooによりメールで送られてくるため  
Gmailでラベルを作成し、未読のメールを読み上げるようにしています。  
メール内の本文をvoicevox で読み上げ、  
文章内にURLがある場合 selenimでダウンロードし  
PDFの文字数が100文字以下なら読み上げ、  
それ以上ならPDFを確認するように音声が流れます。

## 動作環境
M1 MacbookAir 16GB で動作しています、  

音声の作成に voicevox の docker が必要になります  
`docker pull voicevox/voicevox_engine:cpu-ubuntu20.04-latest`  
で取得しています

動作させるには

バックグランドでの起動で
-d オプションをつけて  
`docker run -d  -p '192.168.1.69:50021:50021' voicevox/voicevox_engine:cpu-ubuntu20.04-latest`  
というように起動させます  
IPアドレス部分はご自身のマシンのIPに変えてください

Gmailを操作するためAPIとtoken.jsonが必要になります  
https://developers.google.com/gmail/api/quickstart/python?hl=ja  
を参考にAPIを使用可能にし、token.jsonを取得し同一ディレクトリに設置してください  

config.iniの中にGmailラベルの設定と  
dockerマシンのIPアドレスの設定  
次の顔検出までの設定時間があります  

それぞれの使用環境でセットしてください

として保存

次に
GitHubでパスワード認証が廃止されたため、
HTTPSを使ってリモートリポジトリにアクセスする際にはパーソナルアクセストークン(PAT)を使用するか、
SSHキー認証を使用する必要がある

今回はSSHキー認証を使う

ssh-keygen -t ed25519 -C “メールアドレス”

でパスフレーズを入力

cat id_ed25519

でファイルの中身が見れる

GtHubにログインし、右上のプロフィールアイコンをクリックして「Settings」に進み
「SSH and GPG keys」をクリックし、「New SSH key」ボタンをクリックし
Title」にキーの名前を入力し、「Key」フィールドに公開キーの内容をペースト

Add SSH key」をクリックしてキーを登録

しかし登録がされなかった

再度試す

cat ~/.ssh/id_ed25519.pub | pbcopy

でクリップボードにコピーした値を使ってみた

これが正しい値だった

これにより
SSHで git clone しようとした時の

You don't have any public SSH keys in your GitHub account. You can add a new public key, or try cloning this repository via HTTPS.

が消える

git clone git@github.com:Snowpooll/mail_voice.git


設定したSSHのパスフレーズを入力すれば
Git clone が実行される

次に gitignore と requirements.txtを作成する

 vim .gitignore

でファイルを作成

__pycache__/
query.json
token.json
downloaded_file.pdf
notice.wav
notice_pdf.wav
audio_output.wav
email_body.txt

として保存

次に

vim requirements.txt

でファイルを作成

中身は

PyMuPDF
playsound
configparser
pygame
google-api-python-client
google-auth-oauthlib
google-auth-httplib2
python-dateutil
opencv-python
selenium
requests

あとは

git add .
 git commit -m "add source code"
git push -u origin main

で公開

先にコードをアップして
READMEは後で書くことも可能

Githubへの公開とライセンス関連

Githubへの公開とライセンス関連を調べた

https://github.com/Snowpooll/face_weather
が今回作成したもの

顔を認識するとVOICEVOXで今日の天気を教えてくれる

コンセプトは操作しないこと
アレクサでもいいけど
声が出せないと使えないし

以下は作業ログ

リポジトリ名を
face_weather

publicで公開

Add a README file

readmeを追加

ライセンスはMITライセンスを選択

これでリポジトリを作成すれば
ライセンスの英文は自動で作成してくれる

Readmeを編集してから

git clone https://github.com/Snowpooll/face_weather.git


ローカル環境にリポジトリをクローン

この中にプログラムをコピーしていくが

__pycache__

があった

これは
ChatGPTによれば
__pycache__ は、
Pythonがソースコードをコンパイルした後のバイトコードを格納するディレクトリ

バージョン管理システム(例:Git)を使用している場合は、
通常、__pycache__ ディレクトリを
無視リストに追加することが一般的

なので

 vim .gitignore

でファイルを作成

__pycache__/

として保存

git add .gitignore

で追加

git commit -m "Add __pycache__ to .gitignore"

を実行したら

Author identity unknown

*** Please tell me who you are.

Run

  git config --global user.email "you@example.com"
  git config --global user.name "Your Name"

to set your account's default identity.
Omit --global to set the identity only in this repository.

fatal: unable to auto-detect email address (got 'snowpool@snowpool-Prime-Series.(none)')

となった

そういえば再インストールした時に設定を忘れていたので
git config --global user.name "ユーザ名"
git config --global user.email "メルアド"


再度

git commit -m "Add __pycache__ to .gitignore"

を実行

あと

query.json
test_audio.wav
weather.txt

も無視リストに加えるので

vim .gitignore

でファイルを開き
追記

git add .gitignore
git commit -m "Update .gitignore to include specific files"

で追加

次に

requirements.txt

の作成

これでライブラリ関連のインストールが簡単になる

requests
deepl
pygame
opencv-python
configparser

というようにライブラリを書いておけばOK

git push origin main

でエラー。

remote: Support for password authentication was removed on August 13, 2021.
remote: Please see https://docs.github.com/get-started/getting-started-with-git/about-remote-repositories#cloning-with-https-urls for information on currently recommended modes of authentication.
fatal: Authentication failed for 'https://github.com/Snowpooll/face_weather.git/'

調べたら
GitHubでパスワード認証が廃止されたため、
HTTPSを使ってリモートリポジトリにアクセスする際には
パーソナルアクセストークン(PAT)を使用するか、
SSHキー認証を使用する必要があるらしい

とりあえずPATを使うことにする

GitHubでPATを生成する:
* GitHubにログインし、右上のアカウントアイコンから「Settings」を選択します。
* 左側のサイドバーから「Developer settings」を選択し、「Personal access tokens」に移動します。
* 「Generate new token」をクリックし、必要な権限を選択してトークンを生成します。生成されたトークンは安全な場所にコピー

で作成しようとしたら
New personal access token (classic)
の設定でつまづくので検索

https://dev.classmethod.jp/articles/github-personal-access-tokens/
によれば

Noteにはトークンの使用用途
code maintenanceとした

Expirationにはトークンの有効期限
デフォルトは30だが短いので90にする

Select scopesではトークンが利用可能なGitHub権限を設定
git cloneやgit pullをしたい場合は、repoにチェック

これで
Generate token
をクリックすれば
トークンが表示される

これで再度実行したら

 ! [rejected]        main -> main (fetch first)
error: failed to push some refs to 'https://github.com/Snowpooll/face_weather.git'
hint: Updates were rejected because the remote contains work that you do
hint: not have locally. This is usually caused by another repository pushing
hint: to the same ref. You may want to first integrate the remote changes
hint: (e.g., 'git pull ...') before pushing again.
hint: See the 'Note about fast-forwards' in 'git push --help' for details.

となる

原因は
リモートリポジトリにあなたのローカルリポジトリにはない変更が含まれているために発生

思い当たることとして
READMEを
Githubで編集した後に

git pull origin main

していなかったこと

他の変更はなかったため

git push origin main --force

で強制プッシュ

とりあえずはこれで公開できた

ちなみに後で聞いたのだが
–force は、remoteのものを完全に上書きするので、使わないほうがベター
必要なcommitが消える可能性があるらしい

認証も、SSHキーを使うのがベター
とのこと

Githubへの公開とライセンス関連を調べた

Githubへの公開とライセンス関連を調べた

https://github.com/Snowpooll/face_weather
が今回作成したもの

顔を認識するとVOICEVOXで今日の天気を教えてくれる

コンセプトは操作しないこと
アレクサでもいいけど
声が出せないと使えないし

以下は作業ログ

リポジトリ名を
face_weather

publicで公開

Add a README file

readmeを追加

ライセンスはMITライセンスを選択

これでリポジトリを作成すれば
ライセンスの英文は自動で作成してくれる

Readmeを編集してから

git clone https://github.com/Snowpooll/face_weather.git


ローカル環境にリポジトリをクローン

この中にプログラムをコピーしていくが

__pycache__

があった

これは
ChatGPTによれば
__pycache__ は、
Pythonがソースコードをコンパイルした後のバイトコードを格納するディレクトリ

バージョン管理システム(例:Git)を使用している場合は、
通常、__pycache__ ディレクトリを
無視リストに追加することが一般的

なので

 vim .gitignore

でファイルを作成

__pycache__/

として保存

git add .gitignore

で追加

git commit -m "Add __pycache__ to .gitignore"

を実行したら

Author identity unknown

*** Please tell me who you are.

Run

  git config --global user.email "you@example.com"
  git config --global user.name "Your Name"

to set your account's default identity.
Omit --global to set the identity only in this repository.

fatal: unable to auto-detect email address (got 'snowpool@snowpool-Prime-Series.(none)')

となった

そういえば再インストールした時に設定を忘れていたので
git config –global user.name “Githubユーザ名”
git config –global user.email “メールアドレス”


再度

git commit -m "Add __pycache__ to .gitignore"

を実行

あと

query.json
test_audio.wav
weather.txt

も無視リストに加えるので

vim .gitignore

でファイルを開き
追記

git add .gitignore
git commit -m "Update .gitignore to include specific files"

で追加

次に
requirements.txt
の作成

これでライブラリ関連のインストールが簡単になる

requests
deepl
pygame
opencv-python
configparser

というようにライブラリを書いておけばOK

git push origin main

でエラー。

remote: Support for password authentication was removed on August 13, 2021.
remote: Please see https://docs.github.com/get-started/getting-started-with-git/about-remote-repositories#cloning-with-https-urls for information on currently recommended modes of authentication.
fatal: Authentication failed for 'https://github.com/Snowpooll/face_weather.git/'

調べたら
GitHubでパスワード認証が廃止されたため、HTTPSを使ってリモートリポジトリにアクセスする際にはパーソナルアクセストークン(PAT)を使用するか、SSHキー認証を使用する必要があるらしい

とりあえずPATを使うことにする

GitHubでPATを生成する:
* GitHubにログインし、右上のアカウントアイコンから「Settings」を選択します。
* 左側のサイドバーから「Developer settings」を選択し、「Personal access tokens」に移動します。
* 「Generate new token」をクリックし、必要な権限を選択してトークンを生成します。生成されたトークンは安全な場所にコピー

で作成しようとしたら
New personal access token (classic)
の設定でつまづくので検索

https://dev.classmethod.jp/articles/github-personal-access-tokens/
によれば

Noteにはトークンの使用用途
code maintenanceとした

Expirationにはトークンの有効期限
デフォルトは30だが短いので90にする

Select scopesではトークンが利用可能なGitHub権限を設定
git cloneやgit pullをしたい場合は、repoにチェック

これで
Generate token
をクリックすれば
トークンが表示される

これで再度

git push origin main

実行したら

 ! [rejected]        main -> main (fetch first)
error: failed to push some refs to 'https://github.com/Snowpooll/face_weather.git'
hint: Updates were rejected because the remote contains work that you do
hint: not have locally. This is usually caused by another repository pushing
hint: to the same ref. You may want to first integrate the remote changes
hint: (e.g., 'git pull ...') before pushing again.
hint: See the 'Note about fast-forwards' in 'git push --help' for details.

となる

原因は
リモートリポジトリにあなたのローカルリポジトリにはない変更が含まれているために発生

思い当たることとして
READMEを
Githubで編集した後に

git pull origin main

していなかったこと

他の変更はなかったため

git push origin main --force

で強制プッシュ

とりあえずはこれで公開できた

ちなみに後で聞いたのだが
–force は、remoteのものを完全に上書きするので、使わないほうがベター
必要なcommitが消える可能性があるらしい

認証も、SSHキーを使うのがベター
とのこと

Android Studio と Github 連携

Android Studio と Github 連携

ソースコードの管理をGithub でするために
Android Studio で設定

Android Studio のメニューで
VCS > import into Version Control >
Share Project on Github をクリック

すると
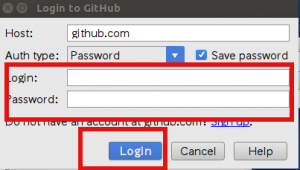
Github へログインするための設定がでるので
Auth type を Password

Login には Github のログインユーザ名
Password には Github のパスワードを入力

ここまでできたら Login をクリック

Screenshot from 2016-12-14 00:32:40

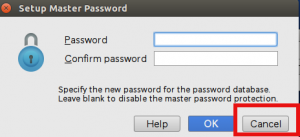
すると次にマスターパスワードを設定するか
聞かれるので、Cancel をクリックします

Screenshot from 2016-12-14 00:36:20

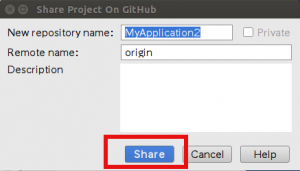
すると次にリポジトリの作成画面になります
New repository name は
リポジトリ名で
デフォルトだとアプリのプロジェクト名になります

Remote name は origin になっているので
そのままでOK

Description はこのリポジトリの説明になりますが
入力しなくても問題ありません

なお無料で使える Github ですが
有料にしないと非公開の Private モードは使えません

ソースを公開したくない場合には
有料プランにするか、もしくは
自身で GitLab などのサーバを構築する必要があります

基本的には
リポジトリの画面はデフォルトのままで
Share をクリックすればOK

Screenshot from 2016-12-14 00:41:32

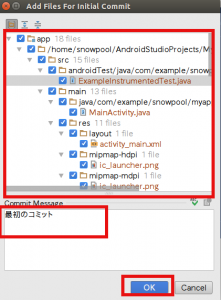
次に、どのファイルをcommit に含めるかを設定します

デフォルトでは
プロジェクトのすべてが対象になっているので
入れたくないものはチェックを外します

Commit Message には
コミットするときのメッセージを入れます
日本語でもOKです

デフォルトだと
Initial commit
ですが
最初のコミット
というように変更してもOKです

ここまでできたらOKをクリック

Screenshot from 2016-12-14 00:47:41

しばらく待つと
Successfully shared project on Github
とメッセージがでれば成功

Screenshot from 2016-12-14 00:48:56

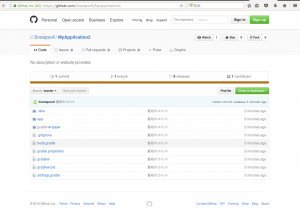
表示されたリンクをクリックすると
Github でのリポジトリのページにアクセスできます

Screenshot from 2016-12-14 00:51:55

github リポジトリへファイル追加

github リポジトリへファイル追加

Github にリポジトリを作成し
REAMDME.md の編集と反映までできたので
次に このリポジトリに
wordpress のテーマをアップしてみます

まず git のローカルリポジトリにファイルをコピーします

テーマそのものは以前に作成したので
これをコピーします

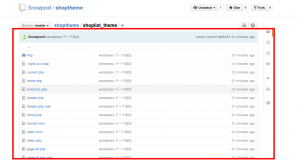
cp -rp /media/bdec1869-7820-4557-a76e-a8b130293019/localdev/shoplist_theme/ .

次に git に追加したファイルをインデックスに登録するため
git add を実行します

git add -A

これで、変更と新規作成したファイルをリポジトリに登録します

git add のオプションについては
git add 使い方

Gitコマンドメモ

を参考にさせていただきました

そして最後に メッセージをつけて commit します

git commit -m "wordpress テーマ追加"

そして push をすることで反映させます

ちなみに、push しないと現在のままです
wp-pull

ちなみに ubuntu 側でもリポジトリを
https で設定していたため

git remote set-url origin git@github.com:Snowpooll/shoptheme.git

で ssh 接続にかえます

そして git push することで反映させます

git push origin master

これで、内容が更新され
新しくソースコードが追加されます

wp-pull2

wp-pull3

Githubから pull して最新状態に

Githubから pull して最新状態に

出先であったので、README.md の編集は
MacBookAir から行いました

返ってきたので、今回の編集の続きは
Ubuntu 12.04 で行います

まずは、前回編集したことによりより、
Ubuntu にあるものよりも
Github にあるデータのほうが新しくなっています

なので、Ubuntu 側のデータを最新版に合わせます

最新への更新には端末を起動して
git pull を行います

まず

 cd /media/bdec1869-7820-4557-a76e-a8b130293019/github/shoptheme/

でリポジトリのあるディレクトリに移動します

リポジトリのないディレクトリにで
git pull しても設定ファイルの .git がないため
エラーになります

ちなみに、現在のUbuntu 側のファイルは

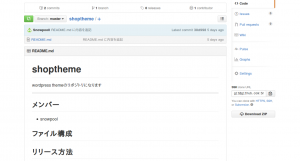
# shoptheme
wordpress theme

です

これを最新にするには

git pull origin master

を実行します

すると

remote: Counting objects: 3, done.
remote: Compressing objects: 100% (2/2), done.
remote: Total 3 (delta 0), reused 3 (delta 0), pack-reused 0
Unpacking objects: 100% (3/3), done.
From https://github.com/Snowpooll/shoptheme
 * branch            master     -> FETCH_HEAD
   754dc93..30d9983  master     -> origin/master
Updating 754dc93..30d9983
Fast-forward
 README.md | 13 +++++++++++--
 1 file changed, 11 insertions(+), 2 deletions(-)

となり設定が反映されます

これで

cat README.md 

で中身を確認すると

# shoptheme 
wordpress themeのリポジトリになります

---

## メンバー
* snowpool

## ファイル構成

## リリース方法

というように変更されているのが確認できます

なお、
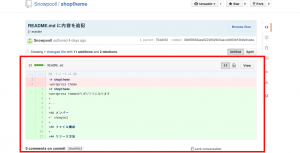
変更箇所についてはgithub からでも確認できます

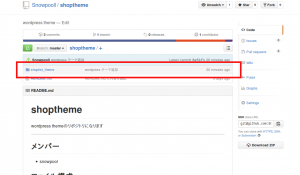
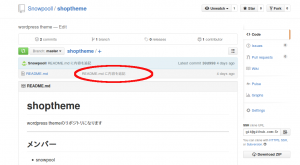
Github リポジトリのファイル名の右にある
コミットしたときのメッセージをクリックします

pull

すると、ドットインストールのソースをみたときのように
変更前のソースがピンク色
変更後のソースが水色で表示されているので
変更点をみることができます

pull2

readme の編集

readme の編集

github のreadme は markdown 形式で記述

これはatom で編集する

http://qiita.com/Qiita/items/c686397e4a0f4f11683d

を参考に

記法は

#がh1などの見出し

*でリスト

で水平線

なお、文書との間に半角スペースをいれること

現在のソースは

# shoptheme

wordpress theme

これを編集して保存

内容は

 shoptheme 

wordpress themeのリポジトリになります


---


## メンバー

* snowpool


## ファイル構成


## リリース方法

としてみた

次に状態の確認

cd shoptheme/

でgit リポジトリディレクトリに移動してから

 git status

そうしないと

fatal: Not a git repository (or any of the parent directories): .git

となる

これは設定ファイル関連の .git が存在しないから

実行すると

On branch master

Your branch is up-to-date with 'origin/master'.


Changes not staged for commit:

  (use "git add <file>..." to update what will be committed)

  (use "git checkout -- <file>..." to discard changes in working directory)


modified:   README.md


no changes added to commit (use "git add" and/or "git commit -a”)

となる

ちなみに source Tree を使っていると

dotinstall みたいに差分がわかる

ちなみに git には3段階あり

作業中の 作業ディレクトリ

確認中の ステージングエリア

出荷前の git ディレクトリ

となっている

とりあえず編集したら

これを確認のためのステージングエリアにする

これは

git add filepattern

ってあるけど

実際には

git add ファイル名のこと

なので

git add README.md

となる

これで git status で確認すると

On branch master

Your branch is up-to-date with 'origin/master'.


Changes to be committed:

  (use "git reset HEAD <file>..." to unstage)


modified:   README.md

となれば成功

source tree でも indexにステージしたファイルに変わっているのが

わかる

ここまでできたらファイル内容の変更を反映する

commit を実行する

git commit -m "README.md に内容を追記"

ここまでは ok

次に

git push origin master

を押すと

なぜかユーザ名とパスワードを聞かれ

エラーになる

原因を調べた結果


[Git] GitHub: SSH鍵認証しているはずなのにパスワードを求められるを解決する方法

によれば

最初にコピーした url が https での url だっただめ

これを修正するために

ssh のほうをコピーして

git remote set-url origin git@github.com:Snowpooll/shoptheme.git

を実行し

git push origin master

を実行したら成功した

ファイルを編集したら

add

commit

push

と覚えておくといいかも

SourceTreeでclone

SourceTreeでclone

まずgithub でリポジトリのclonr 用のurlコピー

sourcetree でファイル> 新規 > 新規/クローンを作成

を選択

リポジトリの追加方法を聞かれるので

clone from url

を選択

ってあるけど日本語化されているので

url からクローンを選択

ソースurl には clone したいリポジトリのurl をいれる

保存先のパスは自動で入力される

これでclone され

ディレクトリに README が作成される

これで次にREADME を編集する

これは

Markdown 形式で行う