ubuntu 16.04 へ Jupyter Notebook インストール
Installing the Jupyter Notebook
https://jupyter.org/install
にインストール方法が掲載されていて
方法は
Anaconda でインストールするか
pip でインストールする
という2つの方法があるようなので
この2つの違いを検索
condaとpip:混ぜるな危険
によれば
Anaconda 下で pip を使うと環境を破壊するとのこと
どちらもパッケージ管理するようだけど
互換性が一切ない
Anaconda で提供されていないパッケージをインストールするには
デフォルト以外のレポジトリからインストールする
というのが無難ぽい
自分で condaパッケージはまだつくれないし
pip をいれると
Anaconda 環境を墓石
他の仮想環境まで破壊するようなので
今回は Anaconda を使うことに
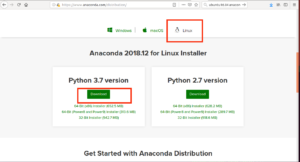
Anaconda Distribution
で
Linux をクリックし
Python 3.7 Version の Download をクリック

ダウンロードできたら
ctrl + alt + t で端末をひらき
cd ダウンロード
bash Anaconda3-2018.12-Linux-x86_64.sh
これで
Welcome to Anaconda3 2018.12

In order to continue the installation process, please review the license
agreement.
Please, press ENTER to continue
となるので
Enter をクリック
===================================
Anaconda End User License Agreement
===================================

Copyright 2015, Anaconda, Inc.

All rights reserved under the 3-clause BSD License:

Redistribution and use in source and binary forms, with or without modification,
 are permitted provided that the following conditions are met:

  * Redistributions of source code must retain the above copyright notice, this
list of conditions and the following disclaimer.
  * Redistributions in binary form must reproduce the above copyright notice, th
is list of conditions and the following disclaimer in the documentation and/or o
ther materials provided with the distribution.
  * Neither the name of Anaconda, Inc. ("Anaconda, Inc.") nor the names of its c
ontributors may be used to endorse or promote products derived from this softwar
e without specific prior written permission.

THIS SOFTWARE IS PROVIDED BY THE COPYRIGHT HOLDERS AND CONTRIBUTORS "AS IS" AND
ANY EXPRESS OR IMPLIED WARRANTIES, INCLUDING, BUT NOT LIMITED TO, THE IMPLIED WA
RRANTIES OF MERCHANTABILITY AND FITNESS FOR A PARTICULAR PURPOSE ARE DISCLAIMED.
--続きます--
となるので
スペースですすめて
Do you accept the license terms? [yes|no]
となったら
yes
を入力
Anaconda3 will now be installed into this location:
/home/snowpool/anaconda3

  - Press ENTER to confirm the location
  - Press CTRL-C to abort the installation
  - Or specify a different location below
とインストール場所を聞かれるので
そのままEnter でOK
最後に
Do you wish the installer to initialize Anaconda3
in your /home/snowpool/.bashrc ? [yes|no]
がでてきて
デフォルトが no なので検索
Anaconda で Python 環境をインストールする
によれば
これは
システムにインストールされている同コマンドを隠してしまう
ので no がデフォルトになっているとのこと
なので
Enter
このあと
To install Visual Studio Code, you will need:
  - Administrator Privileges
  - Internet connectivity

Visual Studio Code License: https://code.visualstudio.com/license

Do you wish to proceed with the installation of Microsoft VSCode? [yes|no]
とでてきたので調べてみたら
テキストエディタ VSCode をインストールするか?
ということなので
no を選択
VSCode に関しては
【ゼロから!】Visual Studio Codeのインストールと使い方
があったけど
いまのところテキストエディタは
Atom と vim で足りているので不要
インストール完了したら
.bashrc にパスを追記
これなら、不要になったときにパスを削除すれば解決
Anaconda を利用した Python のインストール (Ubuntu Linux)
を参考に
echo 'export PATH=/home/snowpool/anaconda3/bin/:$PATH' >> ~/.bashrc
を実行
設定反映のため
source .bashrc
を実行
これで
conda -V
としてバージョンが表示されれば成功
次に Jupyter の設定ファイルの作成
jupyter notebook --generate-config
で設定ファイルを作成
これで
Writing default config to: /home/snowpool/.jupyter/jupyter_notebook_config.py
というように
設定ファイルが作成される
次に、このファイルを開いて
Jupyter Notebook のホームディレクトリを変更
mkdir notebook
で作業ディレクトリを作成
vim .jupyter/jupyter_notebook_config.py
でファイルを開き
/#c.NotebookApp.notebook_dir = ”
で検索すると
261行めあたりにでてくるので
コメントを外し
c.NotebookApp.notebook_dir = '/home/snowpool/notebook'
というように任意の保存場所を指定
Windows の設定の場合は結構でてくるけど
Ubuntu の場合はあまりでてこないので
#c.NotebookApp.notebook_dir = ”
で検索し
Jupyter Notebookのホームディレクトリを変更する方法
を参考に編集
これで
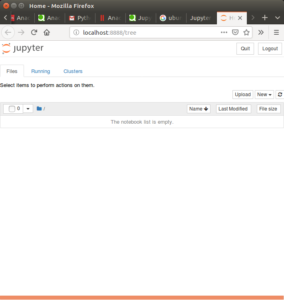
jupyter notebook
を実行すると
ブラウザで jupyter notebook が起動


