
ラズパイ3を Gitサーバに
まずは ssh でログインしてIPを固定しておきます
sudo apt-get install vim
で vim をインストール
次に
interface eth0
static ip_address=192.168.1.208/24
static routers=192.168.1.1
static domain_name_servers=192.168.1.1
というように IPの設定をファイル末尾に追記して保存
固定IPについては
固定IPアドレスの設定(有線LANの場合)
を参考に
固定IPで接続できるかは
sudo shutdown -r now
で再起動し
ssh で接続できれば成功
次にリポジトリの更新と
インストール済みソフトのアップデート
sudo apt-get update
sudo apt-get -y upgrade
次に git サーバに必要なライブラリのインストール
sudo apt-get -y install wget git-core
次に gitユーザを作成
このユーザで gitサーバにアクセスするようにする
sudo adduser git
なおパスワード設定の後に
フルネーム []:
部屋番号 []:
職場電話番号 []:
自宅電話番号 []:
その他 []:
がでるけど
そのまま Enter でOK
以上で正しいですか? [Y/n]
とでたら、 y を入力
次にテストリポジトリの作成
su git
で gitユーザのパスワードをいれて git ユーザになり
cd
で git ユーザのホームディレクトリに移動
mkdir -p ./git_root/test.git
でテストリポジトリのディレクトリ作成
次に空リポジトリの作成
.4 Git サーバー – サーバーのセットアップ
にあるように
作業ディレクトリのない空のリポジトリを初期化
したいので
git init に –bare オプションを指定して実行
cd ./git_root/test.git/
git init --bare
git init
次に GitLab のインストール
GitLab に必要なパッケージを入れるので
sudo apt-get install curl openssh-server ca-certificates postfix apt-transport-https
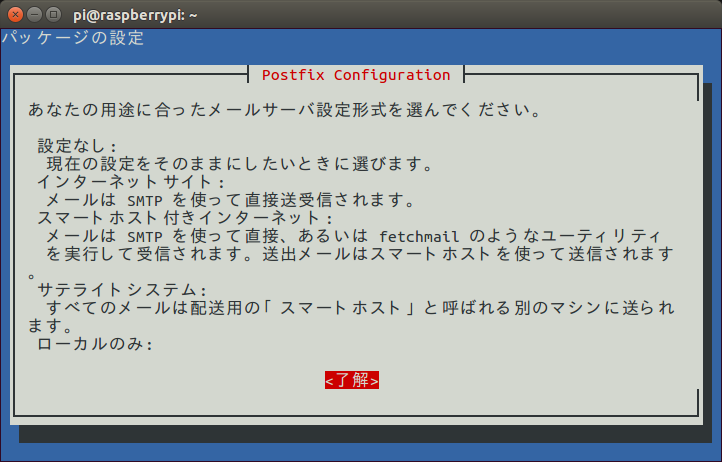
途中で postfix の画面がでてくるので
tab を押して
了解
で Enter
メール設定の形式は
インターネットサイト
を選択し
了解で Enter
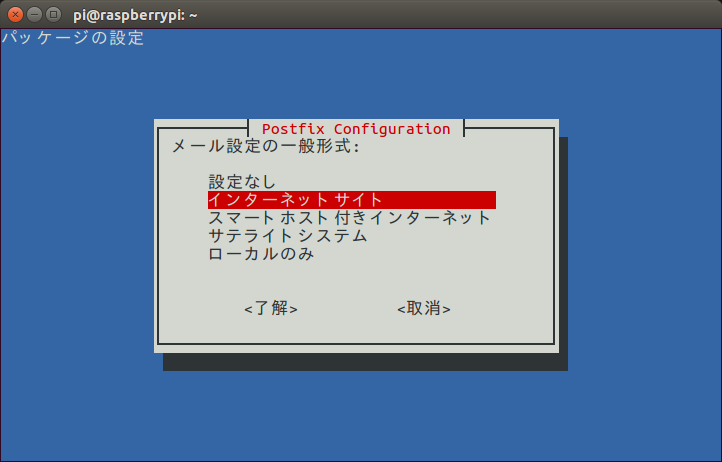
システムメール名は
デフォルトの raspberrypi のままでOK

次に GitLab の gpg.key を追加
curl https://packages.gitlab.com/gpg.key | sudo apt-key add -
次に Gitlab パッケージのインストール
sudo curl -sS https://packages.gitlab.com/install/repositories/gitlab/raspberry-pi2/script.deb.sh | sudo bash
そして GitLab CE Omnibus package
のインストール
sudo apt-get install gitlab-ce
を実行してもパッケージがみつからないため
Turning the RaspberryPi 3 into a local App-Development Server
の中の
If you are not comfortable installing the repository through a piped script, you can find the entire script here and select and download the package manually and install using
を参考にパッケージをダウンロードし
インストールすることに
lsb_release -a
を実行するとバージョンを調べることができる
No LSB modules are available.
Distributor ID:	Raspbian
Description:	Raspbian GNU/Linux 9.3 (stretch)
Release:	9.3
Codename:	stretch
が今回の結果なので
stretch 対応のものを
https://packages.gitlab.com/gitlab/gitlab-ce
からダウンロード
今回は
ubuntu 14.04 へ
gitlab-ce_10.3.3-ce.0_amd64.deb
をダウンロード
そして
scp gitlab-ce_10.3.3-ce.0_amd64.deb pi@192.168.1.208:/home/pi/
でファイルを転送
scp コマンドについては
scpコマンドでファイル送る、とってくる
を参考に
次に ラズパイ3で
sudo dpkg -i gitlab-ce_10.3.3-ce.0_amd64.deb
としたけど
アーキテクチャが違うため
インストール不可
このため、再度 Google で検索し
2017年7月以降のもので検索
を参考に
curl https://packages.gitlab.com/gpg.key | sudo apt-key add -
sudo curl -o /etc/apt/sources.list.d/gitlab_ce.list "https://packages.gitlab.com/install/repositories/gitlab/raspberry-pi2/config_file.list?os=debian&dist=jessie" && sudo apt-get update
を実行し
sudo apt-get install gitlab-ce
でインストールできた
これで
sudo gitlab-ctl reconfigure
で初期設定できる
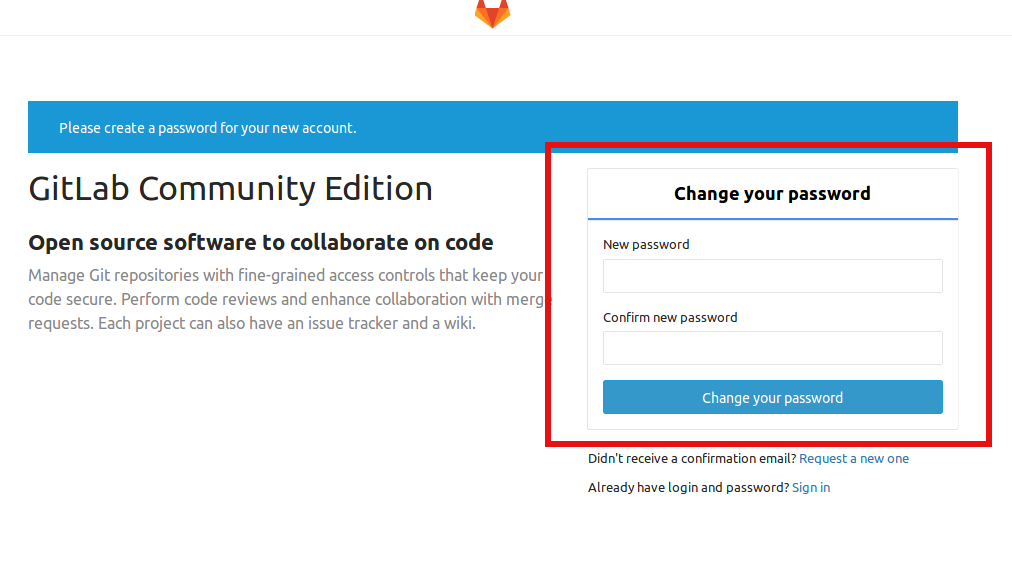
あとは
http://192.168.1.208/
というように
ラズパイ3のIPへブラウザでアクセスすると
GitLab の画面が表示されるので
New password に
新しいパスワードを設定し
Confirm new password
へ
確認のため同じパスワードを入力し
Change your password
をクリック
これでパスワード変更が有効化されるので
ユーザ名 root
パスワードを設定したもので
Sign in をクリック
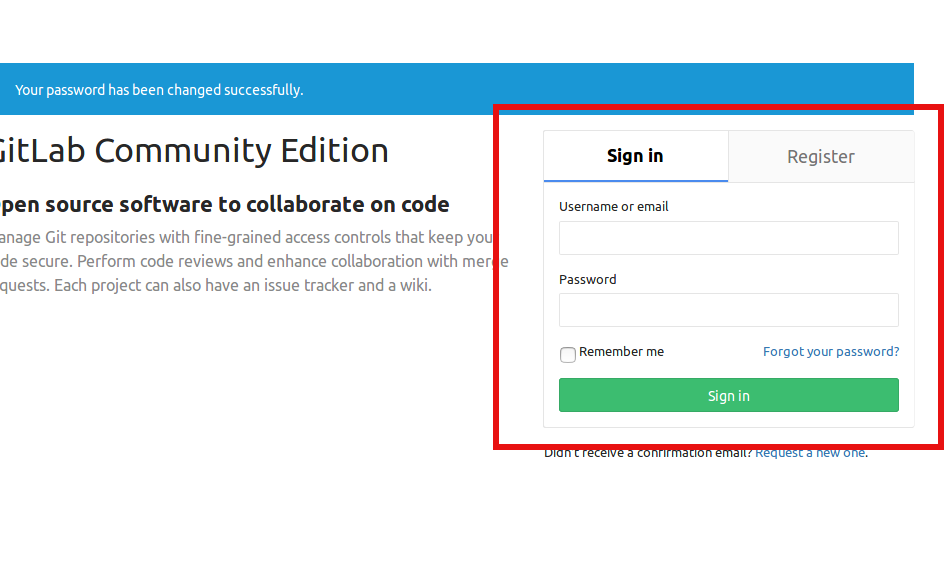
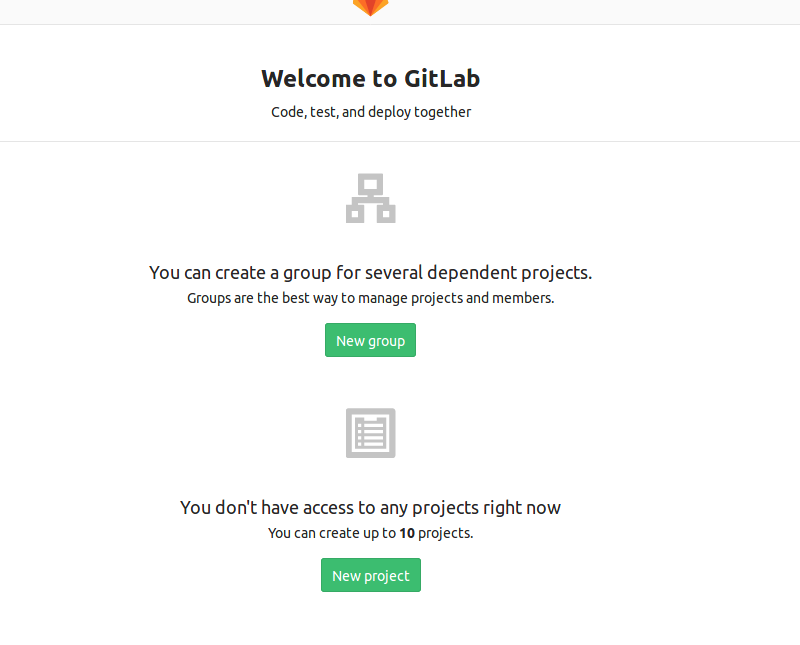
これで Gitlab へログインできます

コメント